Table of Contents
- Bulk FHIR validation
- Aggregation and presentation of bulk validation results
- Based on open standards and powerfull and flexible Open Source Software
- Architecture
- Installation and Configuration
- Setup FHIR Packages
- Create config file
- Setup your FHIR server parameters
- Setup initial password for Jupyter Lab UI
- Start validation environment
- Usage
Bulk FHIR validation
Dockerized Open Source environment for bulk FHIR validation of FHIR resources.
Aggregation and presentation of bulk validation results
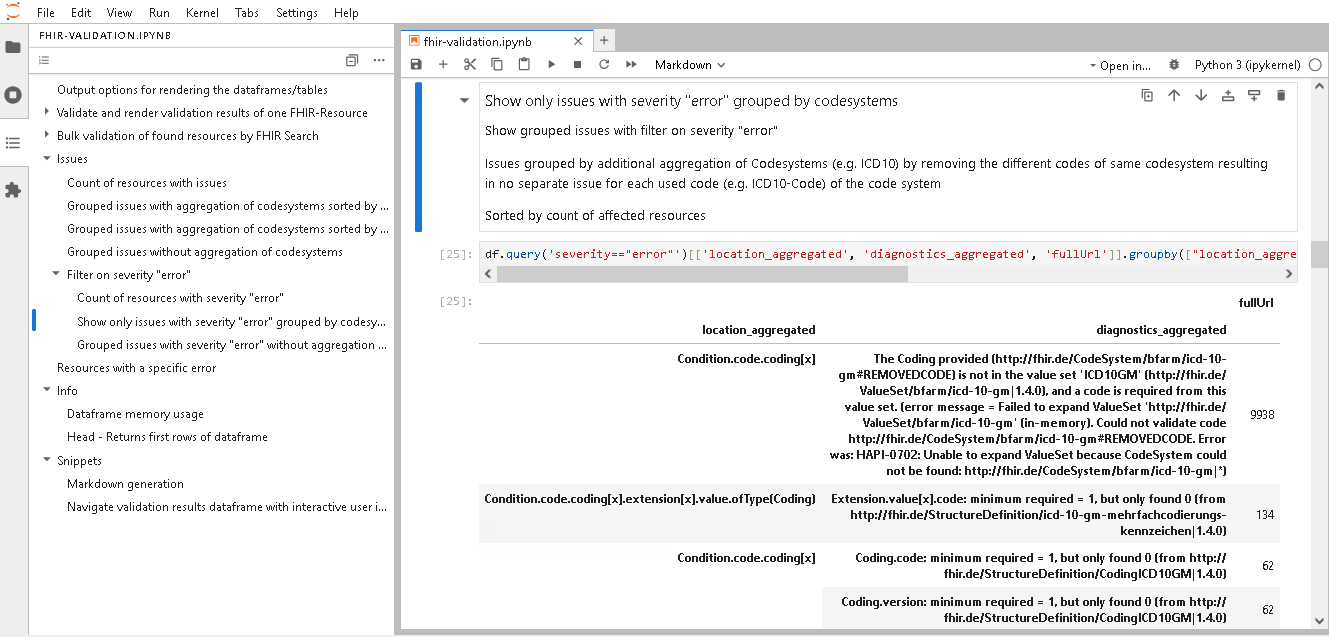
This bulk FHIR validation environment aggregates/groups and presents validation results of bulk FHIR validation of FHIR Search results.
Based on open standards and powerfull and flexible Open Source Software
Therefore this validation environment uses following standards and Open Source Software by the Python Library fhirvalidation.py:
-
Loading FHIR resources to be validated by FHIR search (for documentation see section "Select resources to be validated by FHIR Search parameters" below)
-
FHIR validation by HAPI FHIR Validator configured by Docker environment variables
-
Aggregation by Python Pandas dataframe
-
Presentation of validation results in web UI by Jupyter Lab
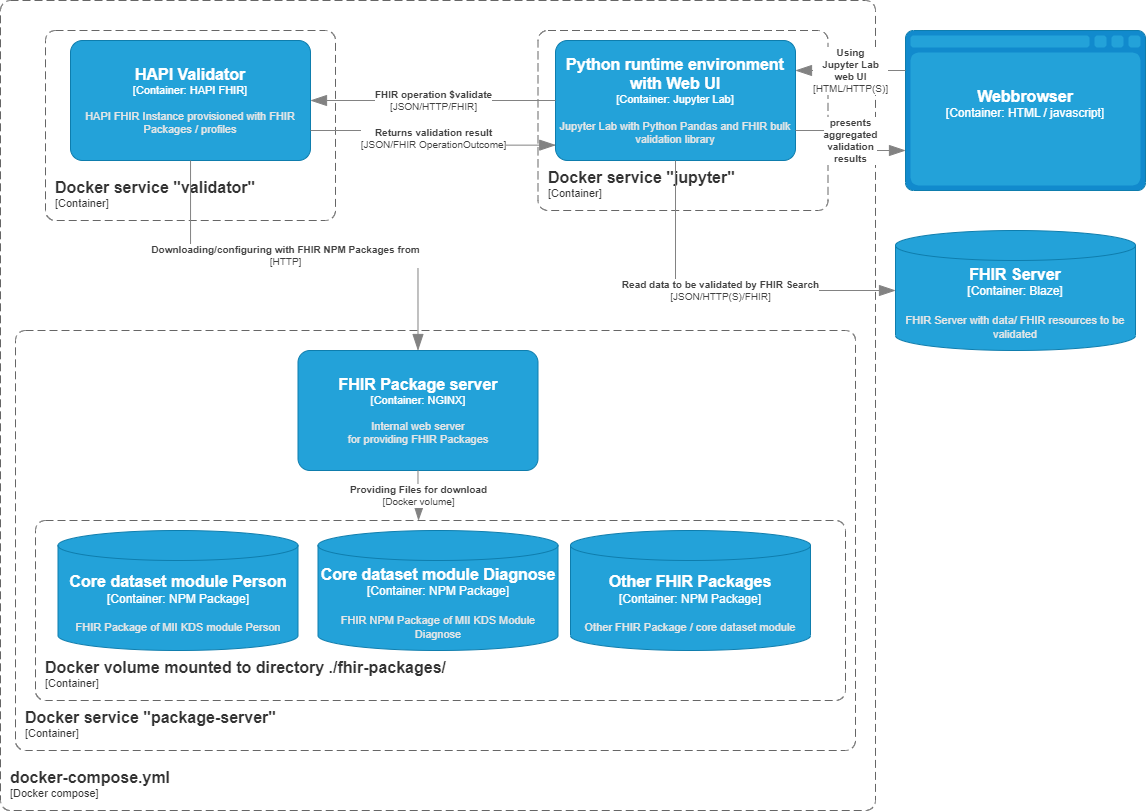
Architecture
Installation and Configuration
Setup FHIR Packages
Download the FHIR NPM Packages of the German MII Core Dataset modules (Kerndatensatz der Medizininformatik Initiative) to the directory fhir-packages.
E.g. by running download-packages.sh:
bash download-packages.sh
If you want to use other FHIR packages, download the NPM packages to the fhir-packages directory and set them up by the environment variables of the HAPI validation service.
The environment variable names is derived from config section implementationguides in HAPIs application.yaml
Create config file
Copy .env.example to .env (so .env which will contain your credentials will be excluded from the git repo by .gitignore):
cp .env.example .env
Setup your FHIR server parameters
Edit .env and set up custom parameters like the URL for your FHIR Server.
Setup initial password for Jupyter Lab UI
Set a custom initial token in variable JUPYTER_TOKEN in .env
Start validation environment
Start the validation environment by
docker compose up -d
Usage
Web UI
Access the web user interface of Jupyter Lab on the configured (default: 80) port: http://yourserver/
Login
Login with the initial password / token you configured in .env
Start validation
Now you can start the validation and aggregation of validation results.
Therefore run the Jupyter Notebook fhir-validation.ipynb.
Navigate validation results
You can navigate the validation results by "Table of Content" of Jupyter Lab. Therefore switch the left navigation bar from "File browser" to "Table of Contents".
User documentation
The further user documentation is embedded in the Jupyter Notebook:
The different outputs are described in markdown cells and used parameters are described in the code cells.
Select resources to be validated by FHIR Search parameters
You can select/filter the resources to be validated by FHIR search parameters.
For filter options you can set search_parameters, see FHIR search common parameters for all resource types, as well as additional FHIR search parameters for certain resource types like Patient, Condition, Observation, ...
Python library
If you dont want to use Jupyter Lab as a user interface (e.g. if you want to generate markdown for CI/CD reports), you can use the Python library fhirvalidation.py returning a pandas dataframe independent from Jupyter Lab.
In the Jupyter Notebook, you can find documentation on how to use the library, including example with code snippets.

